Ubuntu上のJenkinsをアップデートする
Jenkinsのトップページに新しいバージョンの利用可能通知が表示されている場合のアップデート方法。
アップデートファイルのダウンロード
トップページに表示されている通知のダウンロードリンクからjenkins.warをダウンロードする。
Jenkinsを停止する
sudo service jenkins stop
より安全に停止したい場合は、一度ブラウザからビルド状況を確認の上、[Jenkinsの管理]-[シャットダウンの準備]で停止した方が良い(と思う)。
新しいバージョンのファイルに置き換える
sudo cp /home/ユーザー名/ダウンロード/jenkins.war /usr/share/jenkins/jenkins.war
Jenkinsを起動する
service jenkins start
[Jenkinsの管理]-[Jenkinsについて]からバージョンが確認できる。
Visual Studio CodeでPHPファイルを開くと警告が出るときの対応

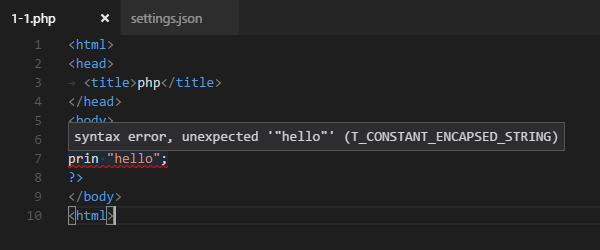
Windows版のVisual Studio CodeでPHPファイルを開くと、Cannot calidate since no PHP executable is set. Use the setting php.validate.executablePath' to configure PHP executable.と警告が出る。
これはVisual Studio CodeにPHPの実行ファイルのパスが設定されていないことで表示されるので、
警告にある通り[ファイル]-[基本設定]-[設定]からsetting.jsonを開き、php.validate.executablePathにphp.exeのフルパスを設定する。*1
setting.json
{
    "php.validate.executablePath": "php.exeのフルパス"
}
php.exeのパスを設定していない時は構文に誤りがあってもシンタックスエラーにならなかったが、設定後はシンタックスエラーが発生するようになった。

入力中に構文チェックをする場合は、リンターを入力時に実行するようsetting.jsonにphp.validate.runの項目を追記する。
setting.json
{
    "php.validate.run": "onType"
}
LogstashをインストールしてElasticsearchにデータを登録する
(2018/02/18) LogstashからElasticsearchへのデータ登録については新しい記事があります。 mamori017.hatenablog.com
前提
Elasticsearch、Kibanaがインストール済みの環境にLogstashをインストールすることを前提にしています。
Logstash
リポジトリを登録する。
$ wget -qO - https://artifacts.elastic.co/GPG-KEY-elasticsearch | sudo apt-key add -
httpsに対応したapt methodをインストールする。
$ sudo apt-get install apt-transport-https
パッケージのダウンロード元を追記する。
$ echo "deb https://artifacts.elastic.co/packages/5.x/apt stable main" | sudo tee -a /etc/apt/sources.list.d/elastic-5.x.list
Logstashをインストールする。
$ sudo apt-get update
$ sudo apt-get install logstash
Elasticsearchにデータを登録する
適当にログを用意する。試しにWindows IISログを/home/share/ubuntu/test.logとして保存したものを使用する。
#Software: Microsoft Internet Information Services 10.0
#Version: 1.0
#Date: 2017-04-12 01:48:53
#Fields: date time s-ip cs-method cs-uri-stem cs-uri-query s-port cs-username c-ip cs(User-Agent) cs(Referer) sc-status sc-substatus sc-win32-status time-taken
2017-04-12 01:51:31 127.0.0.1 GET / - 80 - 127.0.0.1 Mozilla/5.0+(Windows+NT+10.0;+Win64;+x64)+AppleWebKit/537.36+(KHTML,+like+Gecko)+Chrome/56.0.2924.87+Safari/537.36 - 200 0 0 1280
2017-04-12 01:51:31 127.0.0.1 GET /iisstart.png - 80 - 127.0.0.1 Mozilla/5.0+(Windows+NT+10.0;+Win64;+x64)+AppleWebKit/537.36+(KHTML,+like+Gecko)+Chrome/56.0.2924.87+Safari/537.36 http://127.0.0.1/ 200 0 0 11
2017-04-12 01:51:31 127.0.0.1 GET /favicon.ico - 80 - 127.0.0.1 Mozilla/5.0+(Windows+NT+10.0;+Win64;+x64)+AppleWebKit/537.36+(KHTML,+like+Gecko)+Chrome/56.0.2924.87+Safari/537.36 http://127.0.0.1/ 404 0 2 2
データを取り込むための設定を行う。
$ sudo vi /etc/logstash/conf.d/pipeline.conf
pipeline.confについてはよくわかっていないので、とりあえず登録を行うファイルとファイルの読み込み開始位置の設定、登録先のElasticsearchのURLだけを記述した。
input {
    file {
        path => "/home/share/test.log"
        start_position => "beginning"
    }
}

output {
    elasticsearch {
        hosts => ["localhost:9200"]
    }
}
logstashを起動する。
$ sudo service logstash start
curl 'localhost:9200/_cat/indices?v'で登録されているか確認してみる。index項目名がlogstash-yyyy.mm.ddのデータが存在しているはず。
$ sudo curl 'localhost:9200/_cat/indices?v'
health status index               uuid                   pri rep docs.count docs.deleted store.size pri.store.size
yellow open   logstash-2017.04.21 MgSZzLJLSdaFJfhLlUao6A   5   1          7            0     22.4kb         22.4kb
yellow open   .kibana             TjYeEr9cRZShGEaM-BAd0g   1   1          2            0      9.6kb          9.6kb
Kibanaでは取り込んだログを見ることができた。

![データ分析基盤構築入門[Fluentd、Elasticsearch、Kibanaによるログ収集と可視化] データ分析基盤構築入門[Fluentd、Elasticsearch、Kibanaによるログ収集と可視化]](https://images-fe.ssl-images-amazon.com/images/I/51DaJ8XniUL._SL160_.jpg)
データ分析基盤構築入門[Fluentd、Elasticsearch、Kibanaによるログ収集と可視化]
- 作者: 鈴木健太,吉田健太郎,大谷純,道井俊介
- 出版社/メーカー: 技術評論社
- 発売日: 2017/09/21
- メディア: 単行本(ソフトカバー)
- この商品を含むブログ (2件) を見る